
TABLE OF CONTENTS
1. Introduction
2. Navigating the Data Import Tool Pages
2.1 Upload
2.2 Map
2.3 Match
2.4 Review
3. Creating Custom Fields
4. Multi Currency and Multi Company
1. Introduction
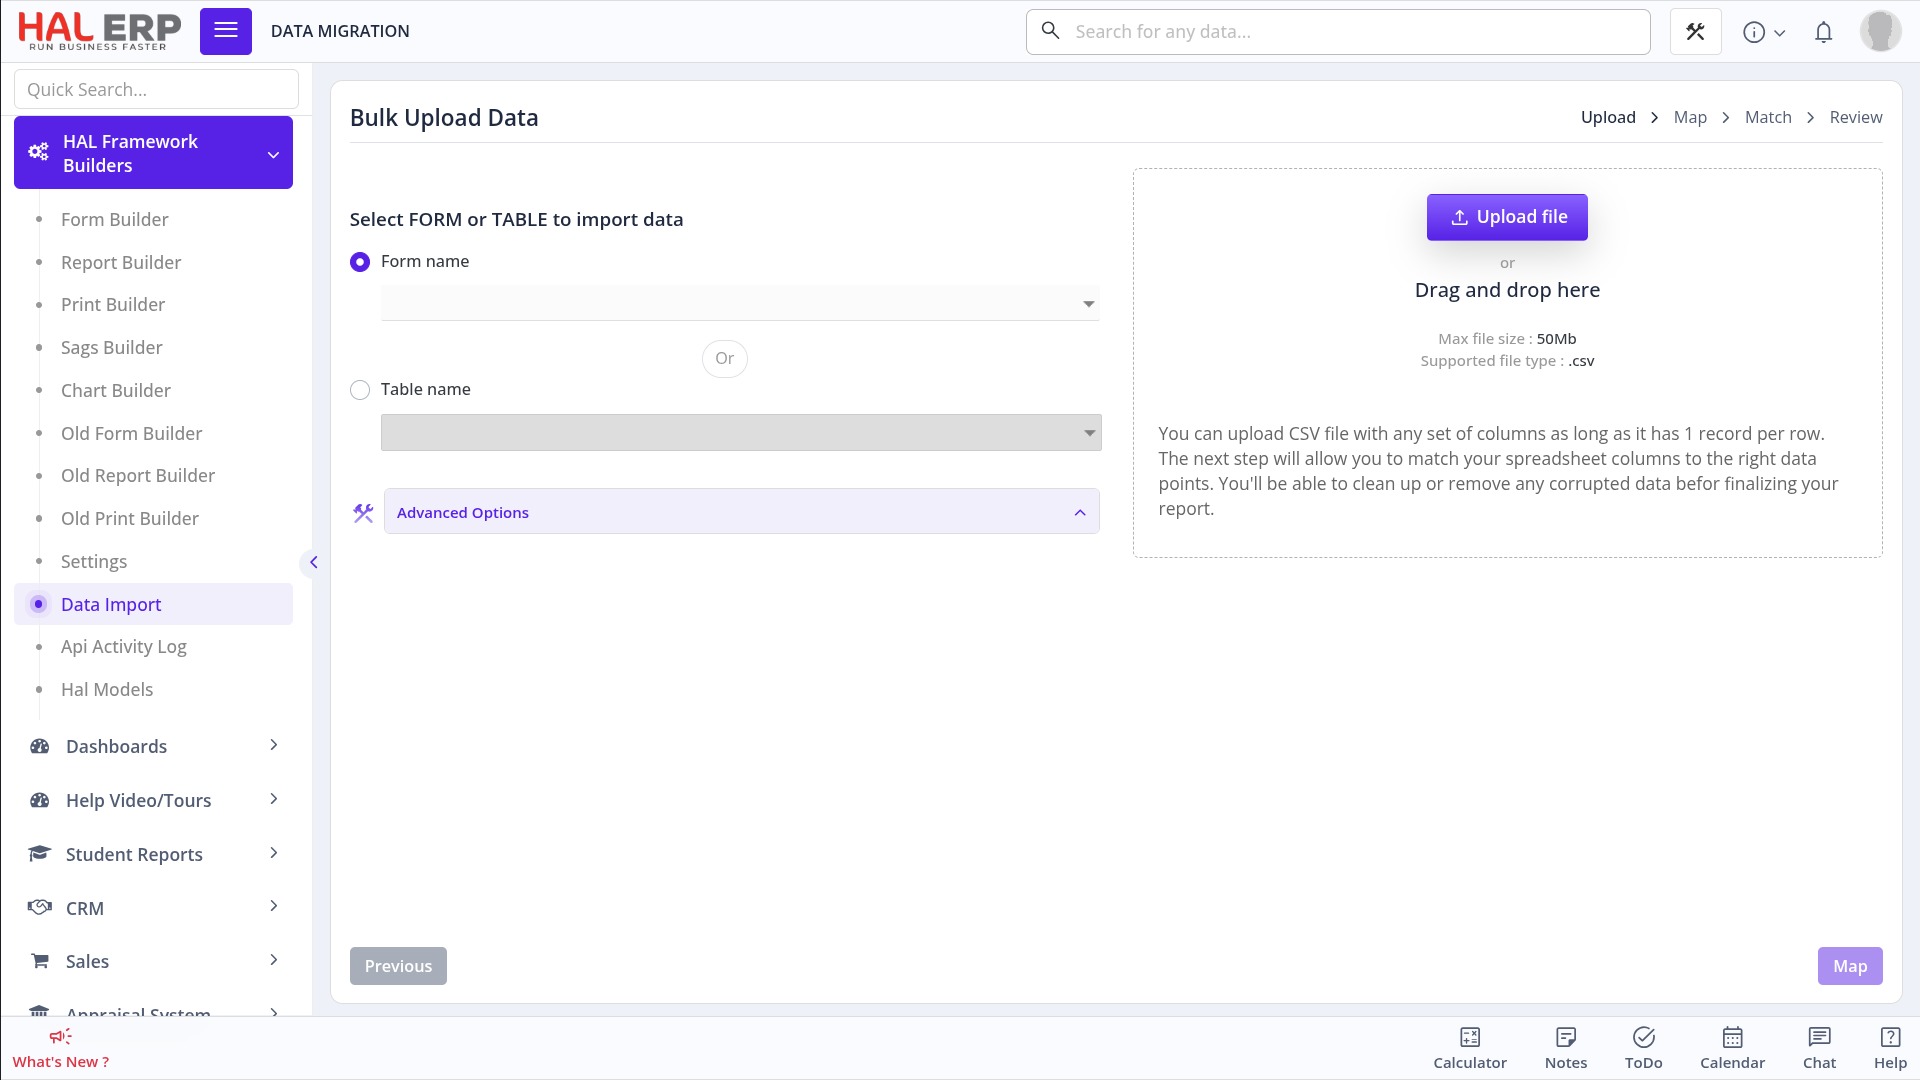
The Data Import Tool can be used to import or update data in bulk into a module in the ERP. This tool is versatile and can be used across all modules, such as Customer Data, Vendor Data, Sales Invoices, and HR Data.
To access this tool, navigate to:
HAL FRAMEWORK BUILDERS >> Data Import
2. Navigating the Data Import Tool Pages
2.1 Upload
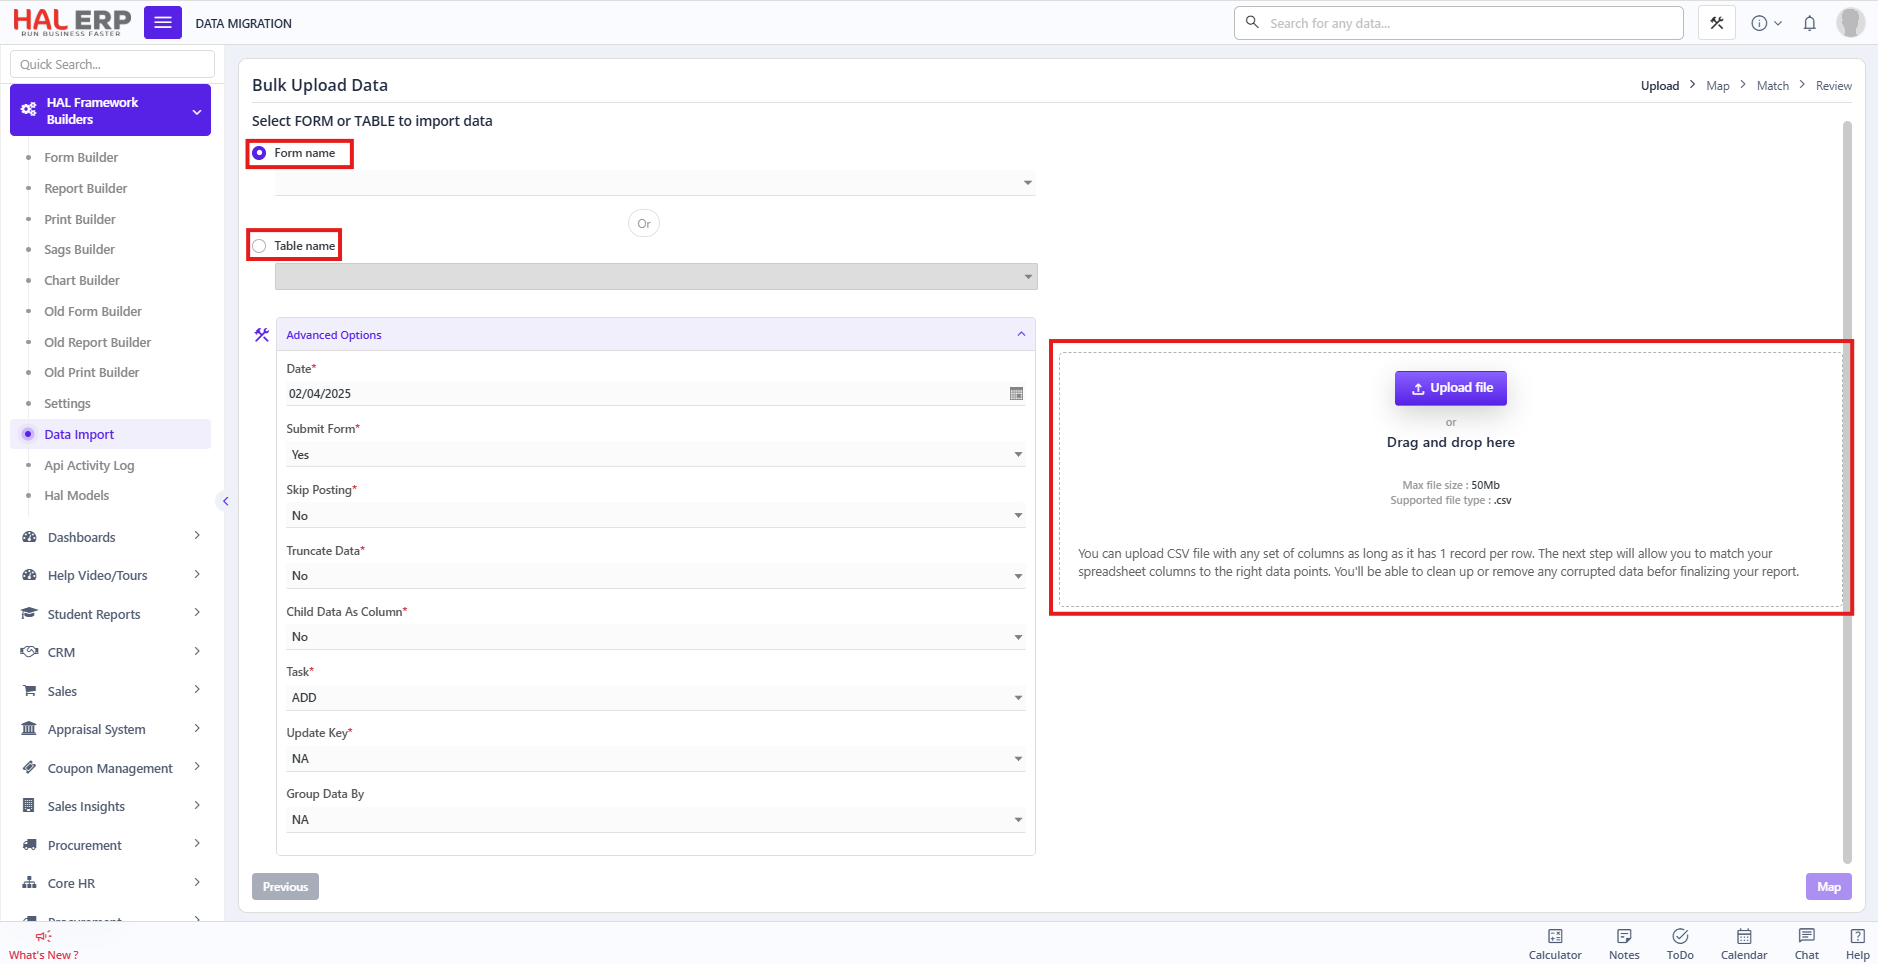
This is the Data Import Tool Upload page.
(If the image is not clear or is not as visible, right-click on the image and select "Open in New Tab" to view it in full screen)
On this page, if you want to import data into a form, select the form name from the Form Name drop-down. This option is selected by default. From the drop-down, choose the module you want to import data into.
If you want to import data into a table instead, select the Table Name option and then choose the table from the Table Name drop-down.
The differences between Form Name and Table Name options are as follows:
| FORM | TABLE |
|---|---|
| Validates data before import, checking for missing fields, formatting issues, and incorrect values. | No data validation — data is inserted as-is. Incorrect formats, null values, or typos are accepted. |
| Data is entered as if you're filling out the form manually. The system checks each entry like it normally would when using the form. | Data goes straight into the database table without using the form. The system does not check the data first. |
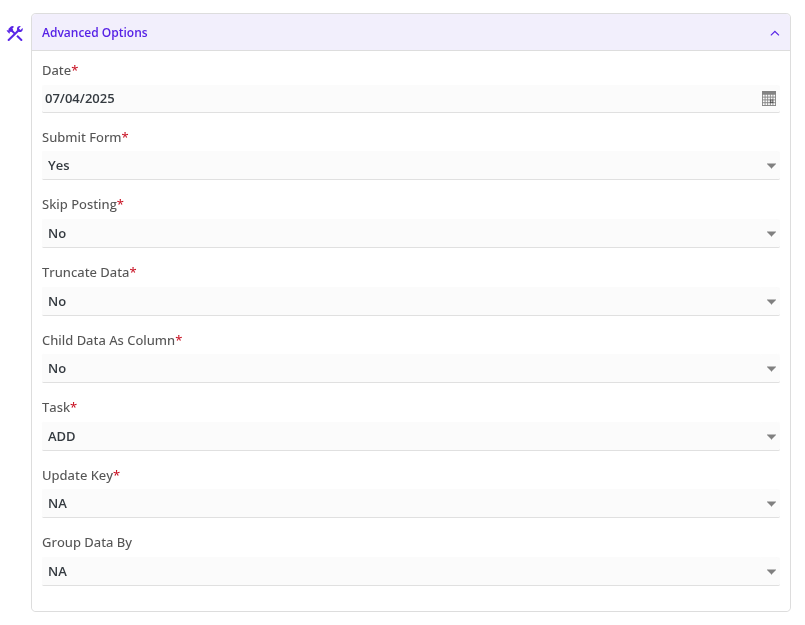
In the Advanced Options section, we configure key settings for importing data, such as:
-
Date – The date the import is being performed. (Used for bookkeeping)
-
Submit Form – This is set to YES by default.
-
Skip Posting – Choose YES if you do not want the data to post into financial ledgers or similar systems.
-
Clear All Data – Choose YES to wipe out existing records in the ERP before import.
<strong data-identifyelement="546" dir="ltr">WARNING: If you Clear your form, Then ALL data available in that form previously WILL BE REMOVED PERMANENTLY</strong> -
Child Data as Column – Set to YES if you want row-entered data to be interpreted as columns.
<strong data-end="79" data-identifyelement="515" data-start="67">Example:</strong> When importing payroll data, the template might have <strong data-end="160" data-identifyelement="516" data-is-only-node="" data-start="133" dir="ltr">packages listed in rows</strong> and <strong data-end="189" data-identifyelement="517" data-start="165">employees in columns</strong>. However, the ERP system expects the opposite format—<strong data-end="264" data-identifyelement="518" data-start="243">employees in rows</strong> and <strong data-end="292" data-identifyelement="519" data-start="269">packages in columns</strong>. By enabling this option, the system will automatically adjust the data layout during import to match the ERP's expected format. -
Task – Select from:
- ADD: When adding new data to the ERP.
- UPDATE: When updating existing data in the ERP.
-
Update Key – When Task is set to UPDATE, select the column that should be used as the reference to update records.
<strong data-end="89" data-identifyelement="523" data-start="77">Example:</strong> When importing customer data and you want to <strong data-end="161" data-identifyelement="524" data-is-only-node="" data-start="135">update specific fields</strong> for records that already exist (like correcting names or contact info), the system needs to know how to identify each record. By selecting a <strong data-end="320" data-identifyelement="525" data-start="303">unique column</strong> (such as Customer ID or Customer Docnum) from the drop-down, you’re telling the system which field to use to find and update the correct records. -
Group Data By – Select a column from the uploaded data to group the records by that column.
<strong data-end="72" data-identifyelement="528" data-start="60">Example:</strong> When importing customer invoices, the data might be structured so that <strong data-end="183" data-identifyelement="529" data-is-only-node="" data-start="144">each line item is in a separate row</strong>, with the <strong data-end="226" data-identifyelement="530" data-start="194">same invoice number repeated</strong> across those rows. To help the system recognize that all these line items belong to <strong data-end="333" data-identifyelement="531" data-start="311">one single invoice</strong>, you use this feature to <strong data-end="401" data-identifyelement="532" data-start="359">group rows based on a repeating column</strong>—like the Invoice Number—so they’re imported as one complete invoice.
The Upload File section is where you upload the data file
<strong data-end="2319" data-identifyelement="573" data-start="2310" dir="ltr"><span data-identifyelement="574" dir="ltr">Note:</span></strong>The file must be in <strong data-end="2348" data-identifyelement="575" data-start="2340">.csv</strong> format and should follow the provided template for the selected form.
Click on Map when done to proceed to the next page.
2.2 Map
This is the Map page of the Data Import Tool.
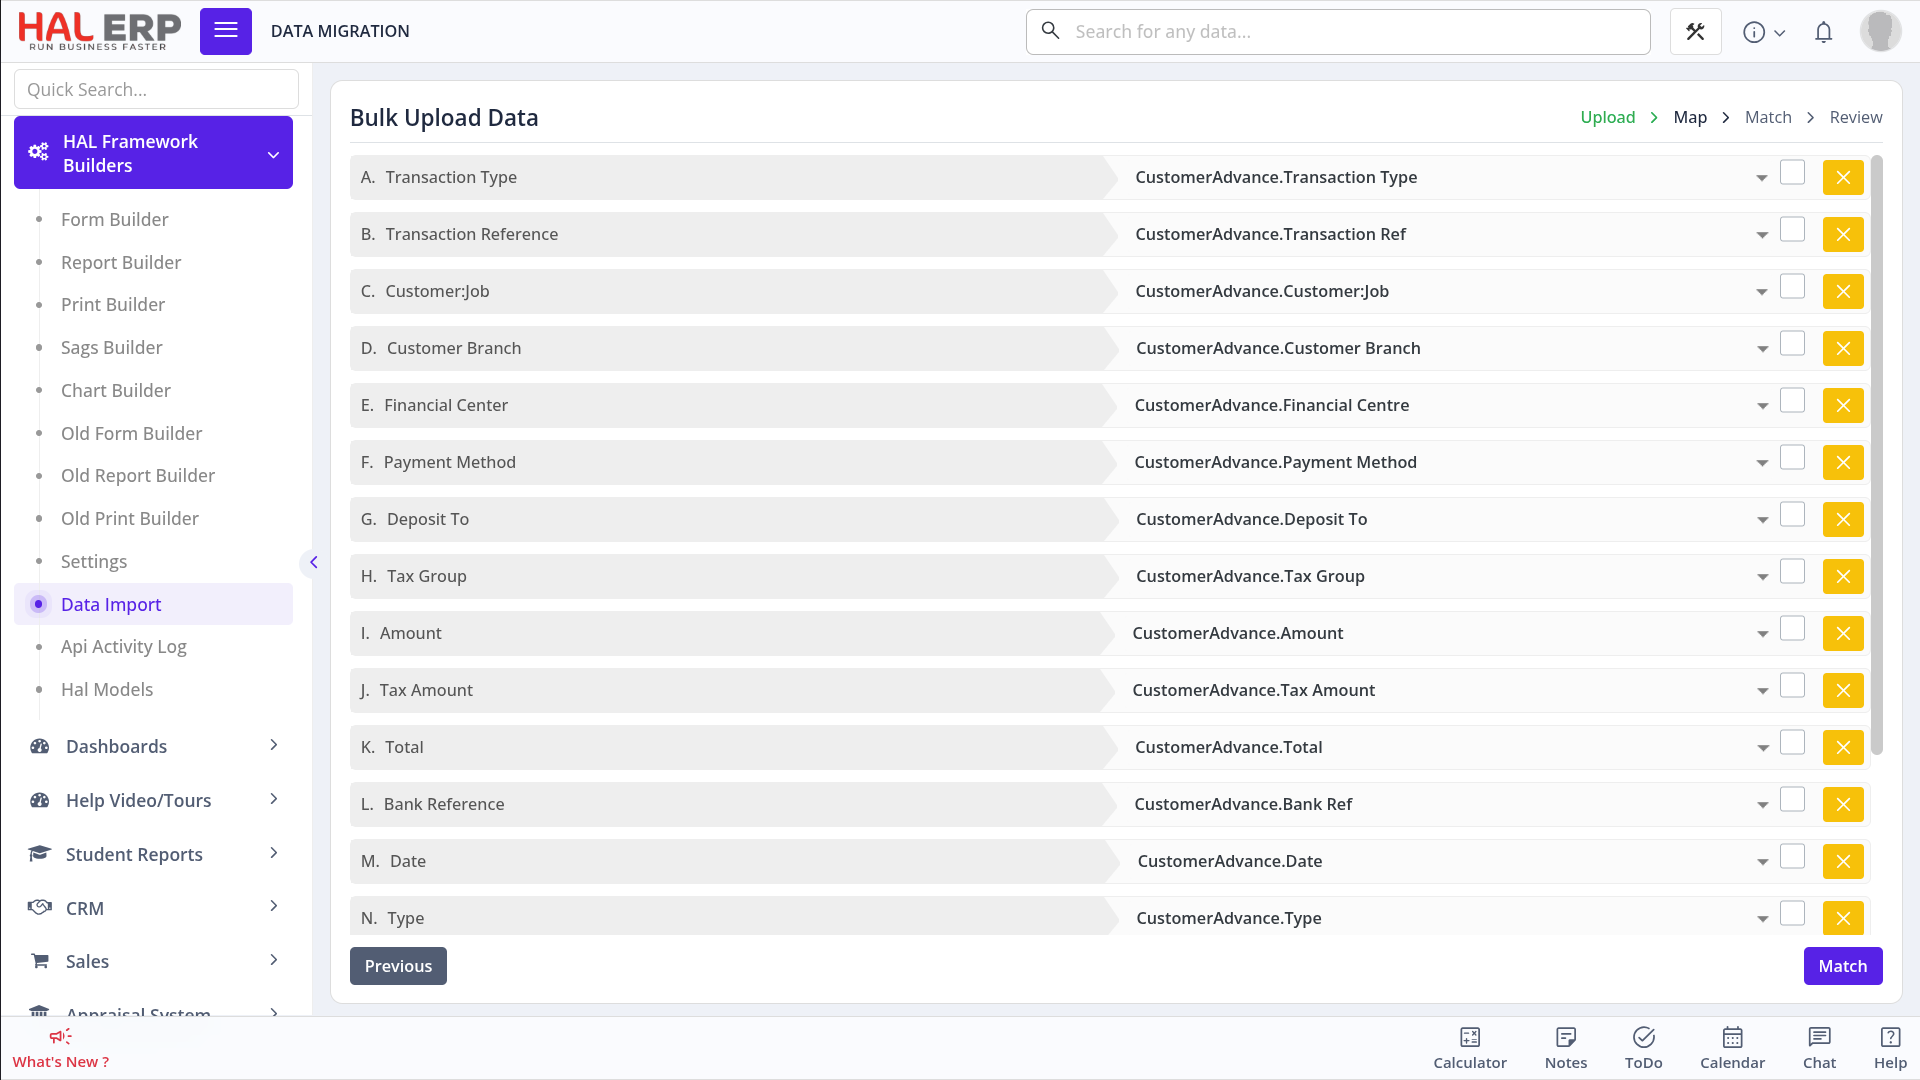
This screen is where you map the columns from your uploaded file to the corresponding fields in the ERP database.
Each row in your uploaded file should match a field in the selected ERP module. For example, if your file includes a column called "Transaction Type", you need to map it to CustomerAdvance.Transaction Type.
Here’s what that means:
- CustomerAdvance → the name of the database table you're importing data into.
- Transaction Type → the specific field (column) in that table.
<span data-identifyelement="553"><strong data-end="731" data-identifyelement="554" data-start="724" dir="ltr">NOTE</strong>: Make sure each column from your file is mapped to the correct ERP field to avoid data import errors. Once all fields are matched correctly, click <strong data-end="891" data-identifyelement="555" data-start="880">"Match"</strong> to proceed with the data upload.</span>
<span data-identifyelement="559" dir="ltr"><strong data-identifyelement="560" dir="ltr">TIP:</strong> If you use the Template provided in the Guides, it will auto map the columns in the sheet to the corresponding columns in the ERP correctly.</span>
2.3 Match
This is the Match page of the Data Import Tool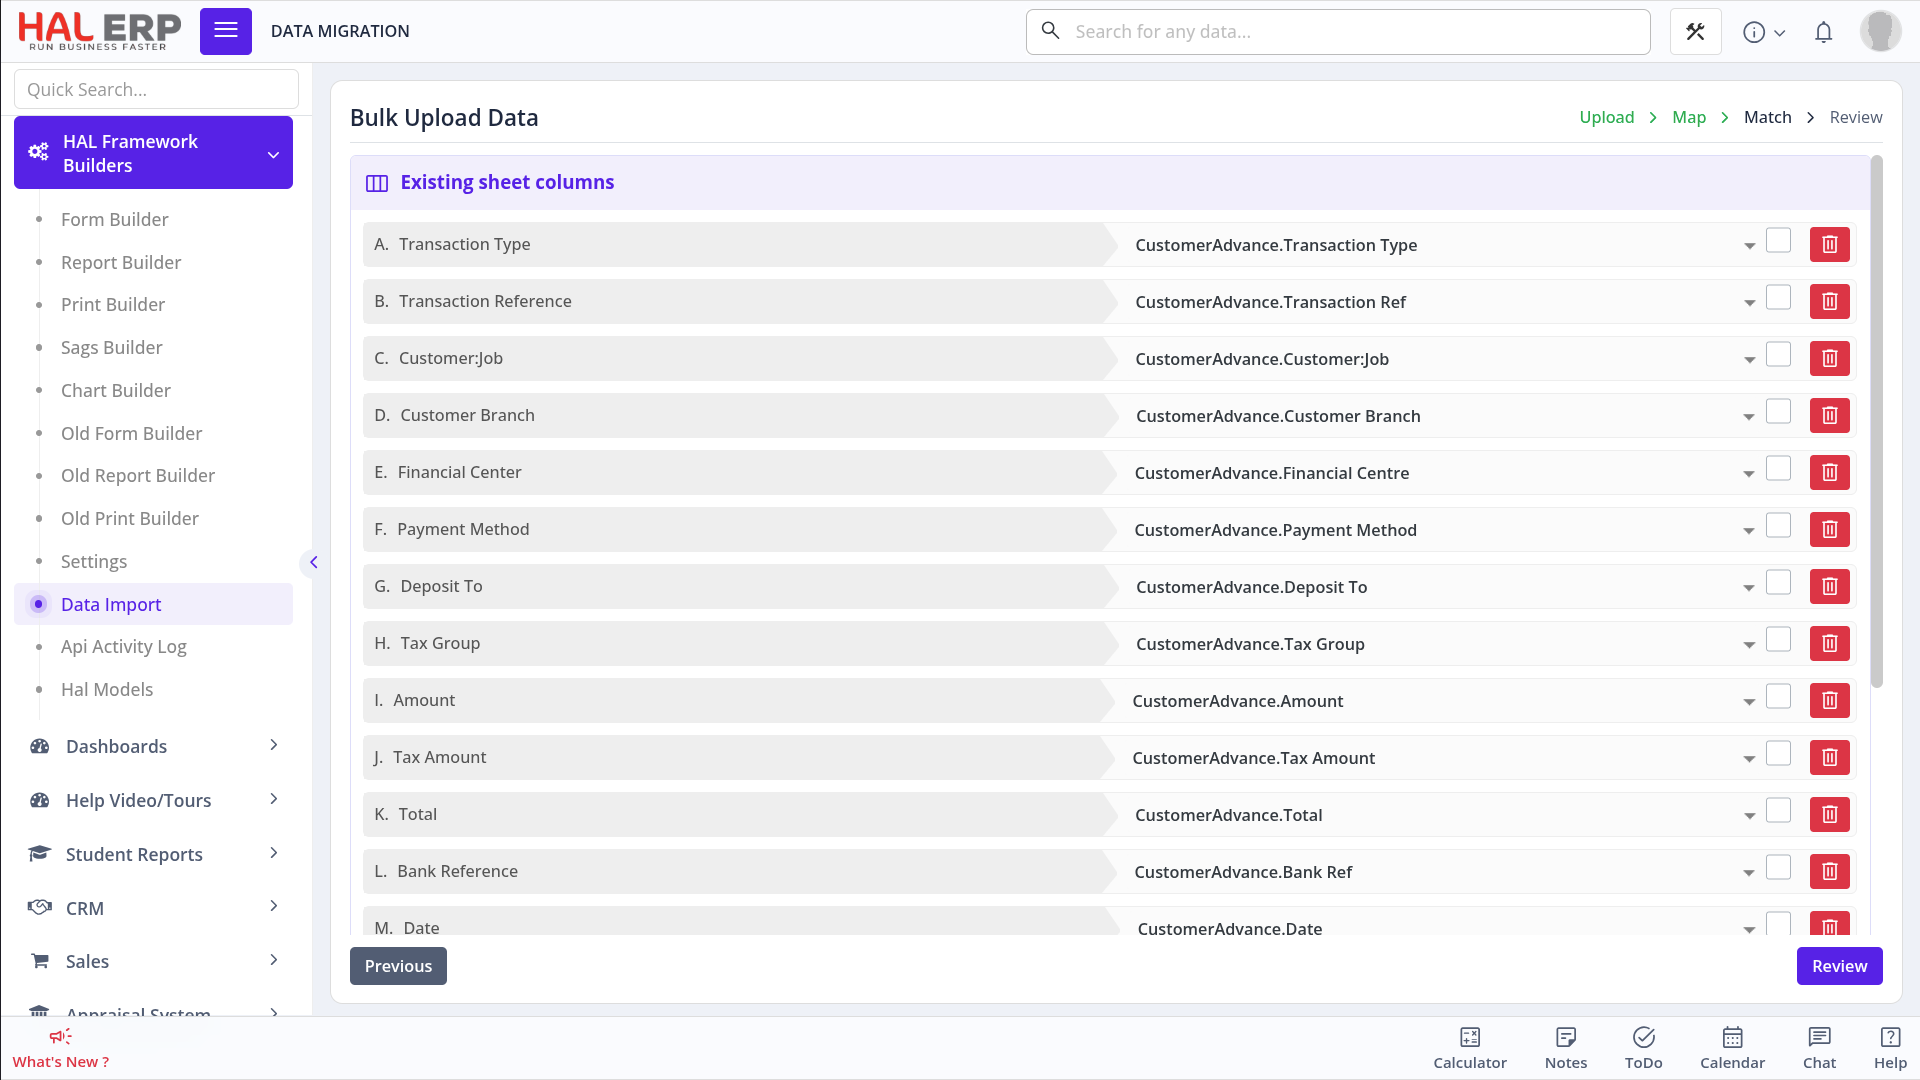
After coming from the Map page, the tool performs the following checks:
- Verifies that all mandatory fields have been mapped and contain non-empty values.
- If mandatory fields are left empty, you can still proceed by clicking Review and entering values on the next page.
- Detects if any columns have been mapped more than once and shows an error.
- Flags any duplicated column names within the same file.
When errors such as:
- Columns from the sheet are mapped twice to the same internal ERP Column

- Columns from the sheet have the same name

- Mandatory Columns are not mapped
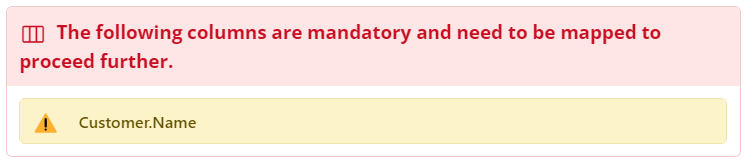
occur, ensure to read through the messages and double check for any of these mistakes.
2.4 Review
This is the Review page of the Data Import Tool.
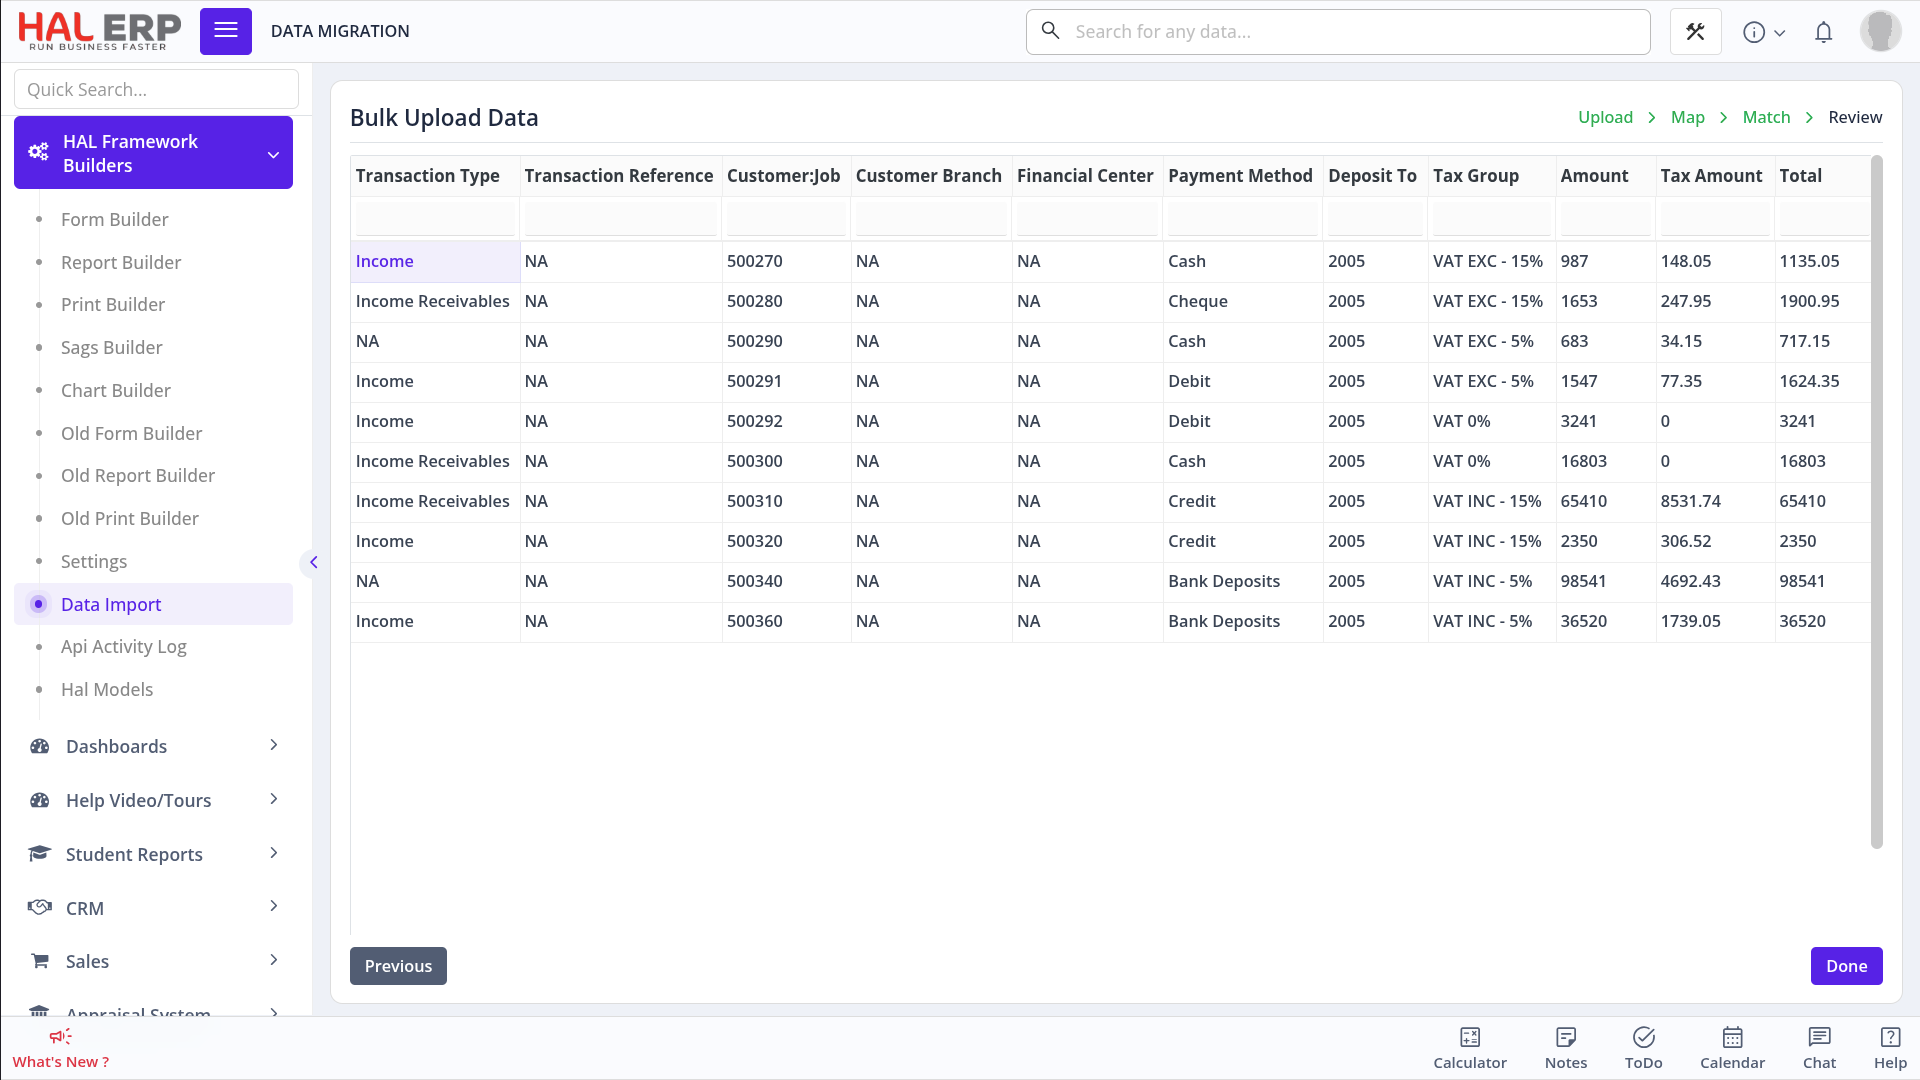
On this page, you can:
- Verify that the uploaded data is correct and in the required format.
- Enter any missing data directly, if it hasn’t been filled yet.
When you're done reviewing the data, click Done. The tool will then attempt to update the ERP with the data.
If there are any errors—such as data in the wrong format or values outside the allowed range—an error message will appear, identifying the specific column and listing the acceptable data values. You can fix the data directly on this page without needing to restart the process.
Once you’ve made all the necessary corrections, click Done again to complete the process.
If all errors are cleared, you will receive a success notification in the top-right corner and a prompt to reload the page.
<span data-identifyelement="682" dir="ltr">Whether you click <strong data-end="4337" data-identifyelement="683" data-start="4327">Reload</strong> or <strong data-end="4351" data-identifyelement="684" data-start="4341">Cancel</strong>, the import will have completed successfully, and the changes can be viewed in the module’s <strong data-end="4454" data-identifyelement="685" data-start="4444">Report</strong> page.</span>
3. Creating Custom Fields
Based on Client request and need, we would have to create a Custom Field in the Form for the data that they have asked.
The steps to do so are:
-
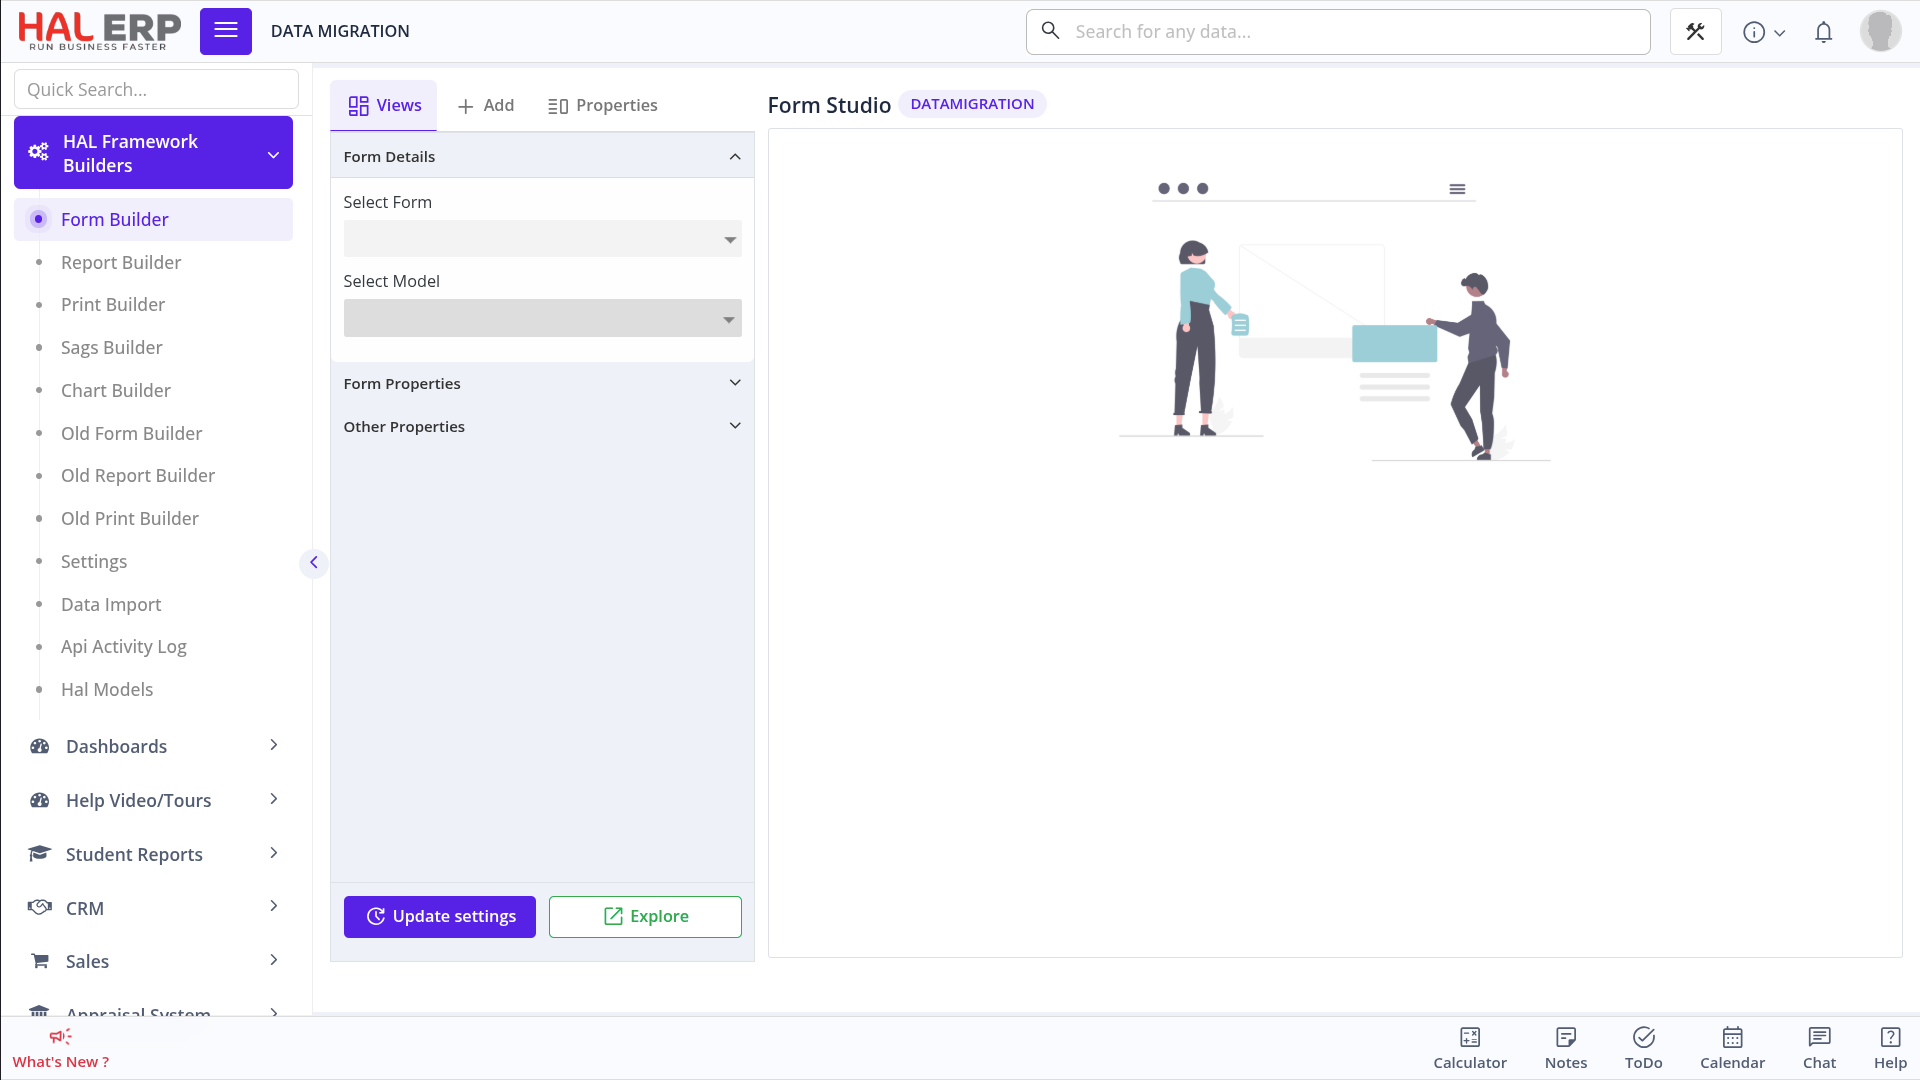
Navigate to Form Builder
HAL Framework Builders >> Form Builder
-
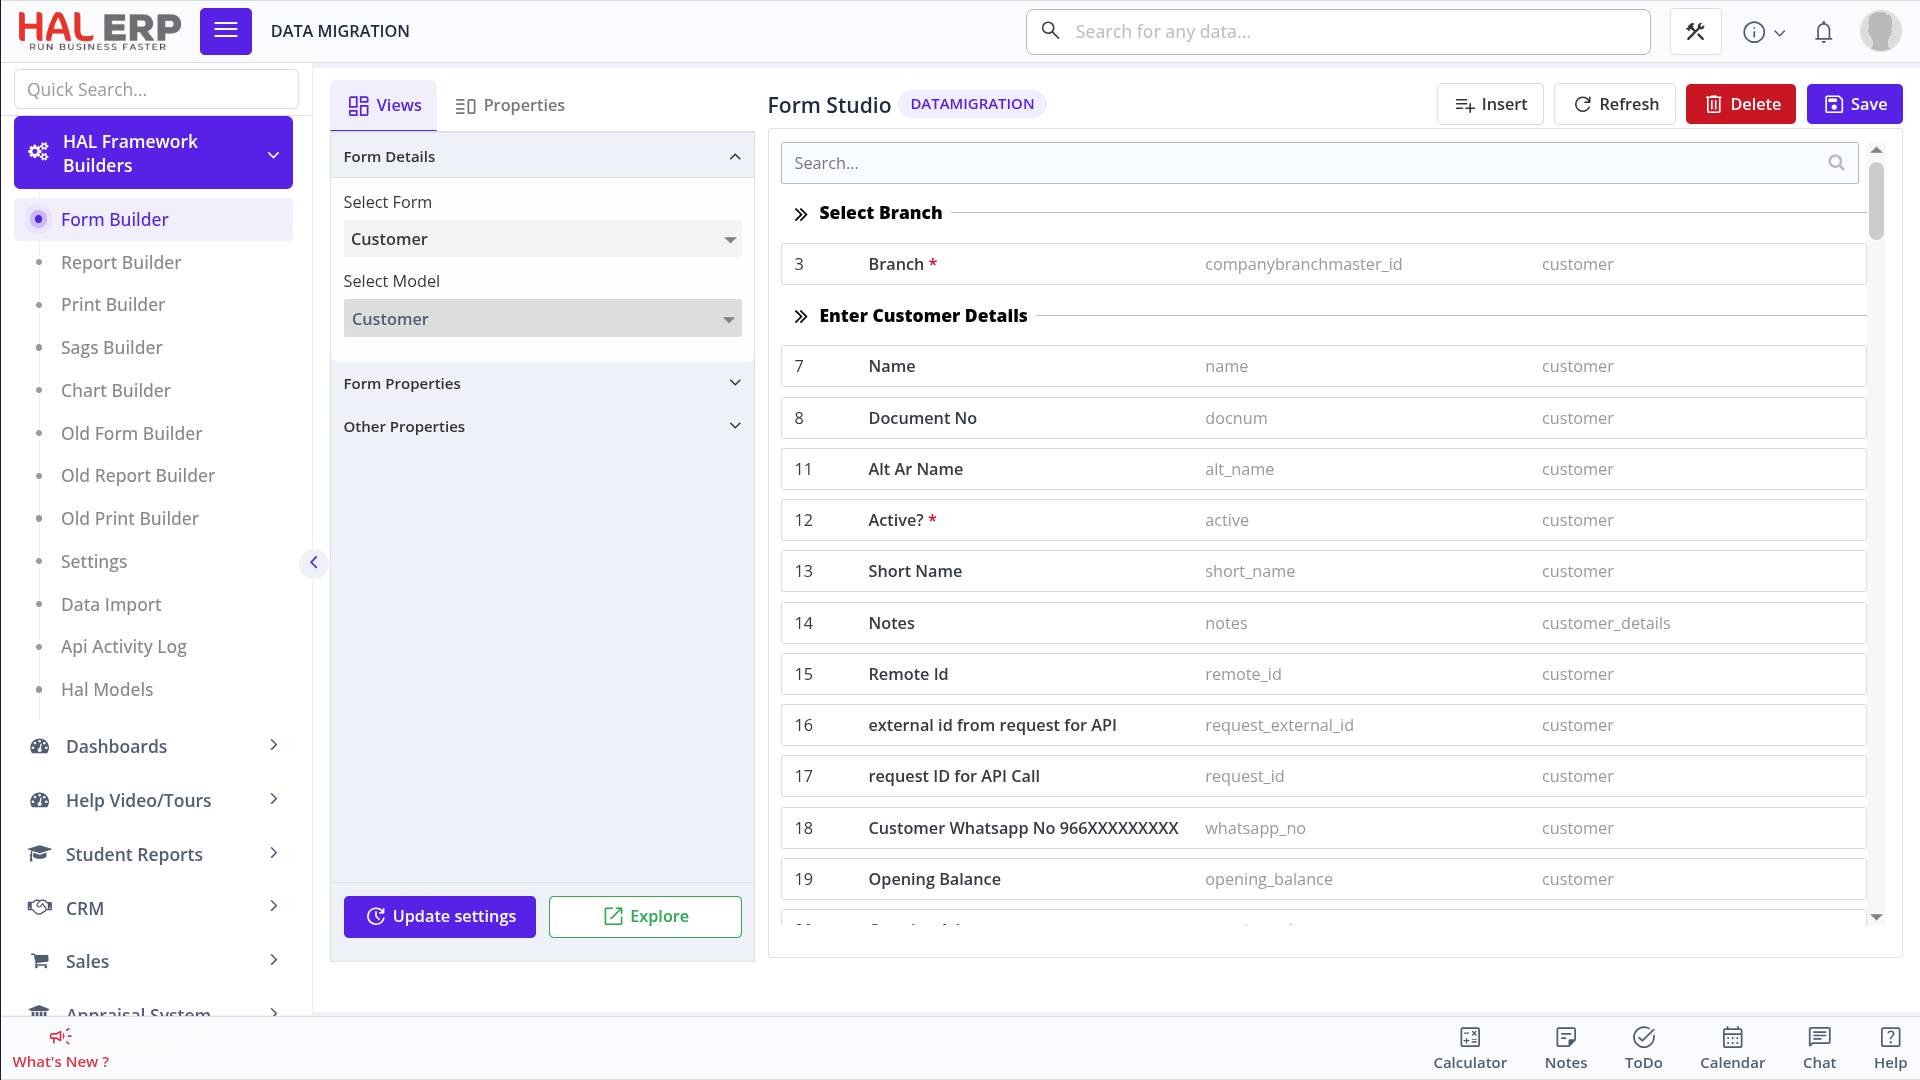
Under "Select Form" select the module in the drop-down that you want to create a Custom Field in. If it is Customer List, then select Customer in the drop-down.
For this example, we shall use Customer module
-
Select Insert button on the top right and a pop up will appear
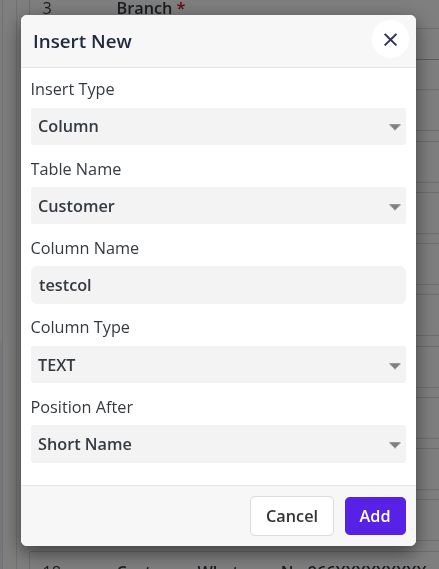 Select the following settings:
- Insert Type: Select Column for the Custom Field to be able to input data
- Table Name: Choose which Table in that form you want this new field to be in
- Column Name: Enter the name for the Custom Field that you are creating
- Column Type: Select the Type of Data this column should accept such as -
- TEXT - This is VARCHAR, meaning it will make input datatype to be word type data
- NUMBER - This is INT, meaning it will make input datatype to be all Integers and numbers data
- DATE - This will input datatype to be date format data
- ENUM - This will make the input data type to be a pre-determined Boolean data set such as true/False, Yes/No, Active/Void, Partial/Full and so on
- Position After: In this drop-down, you select where you want the Custom Field to show up after
-
Once the settings have been selected, clicking on Add will add the custom field to the database.
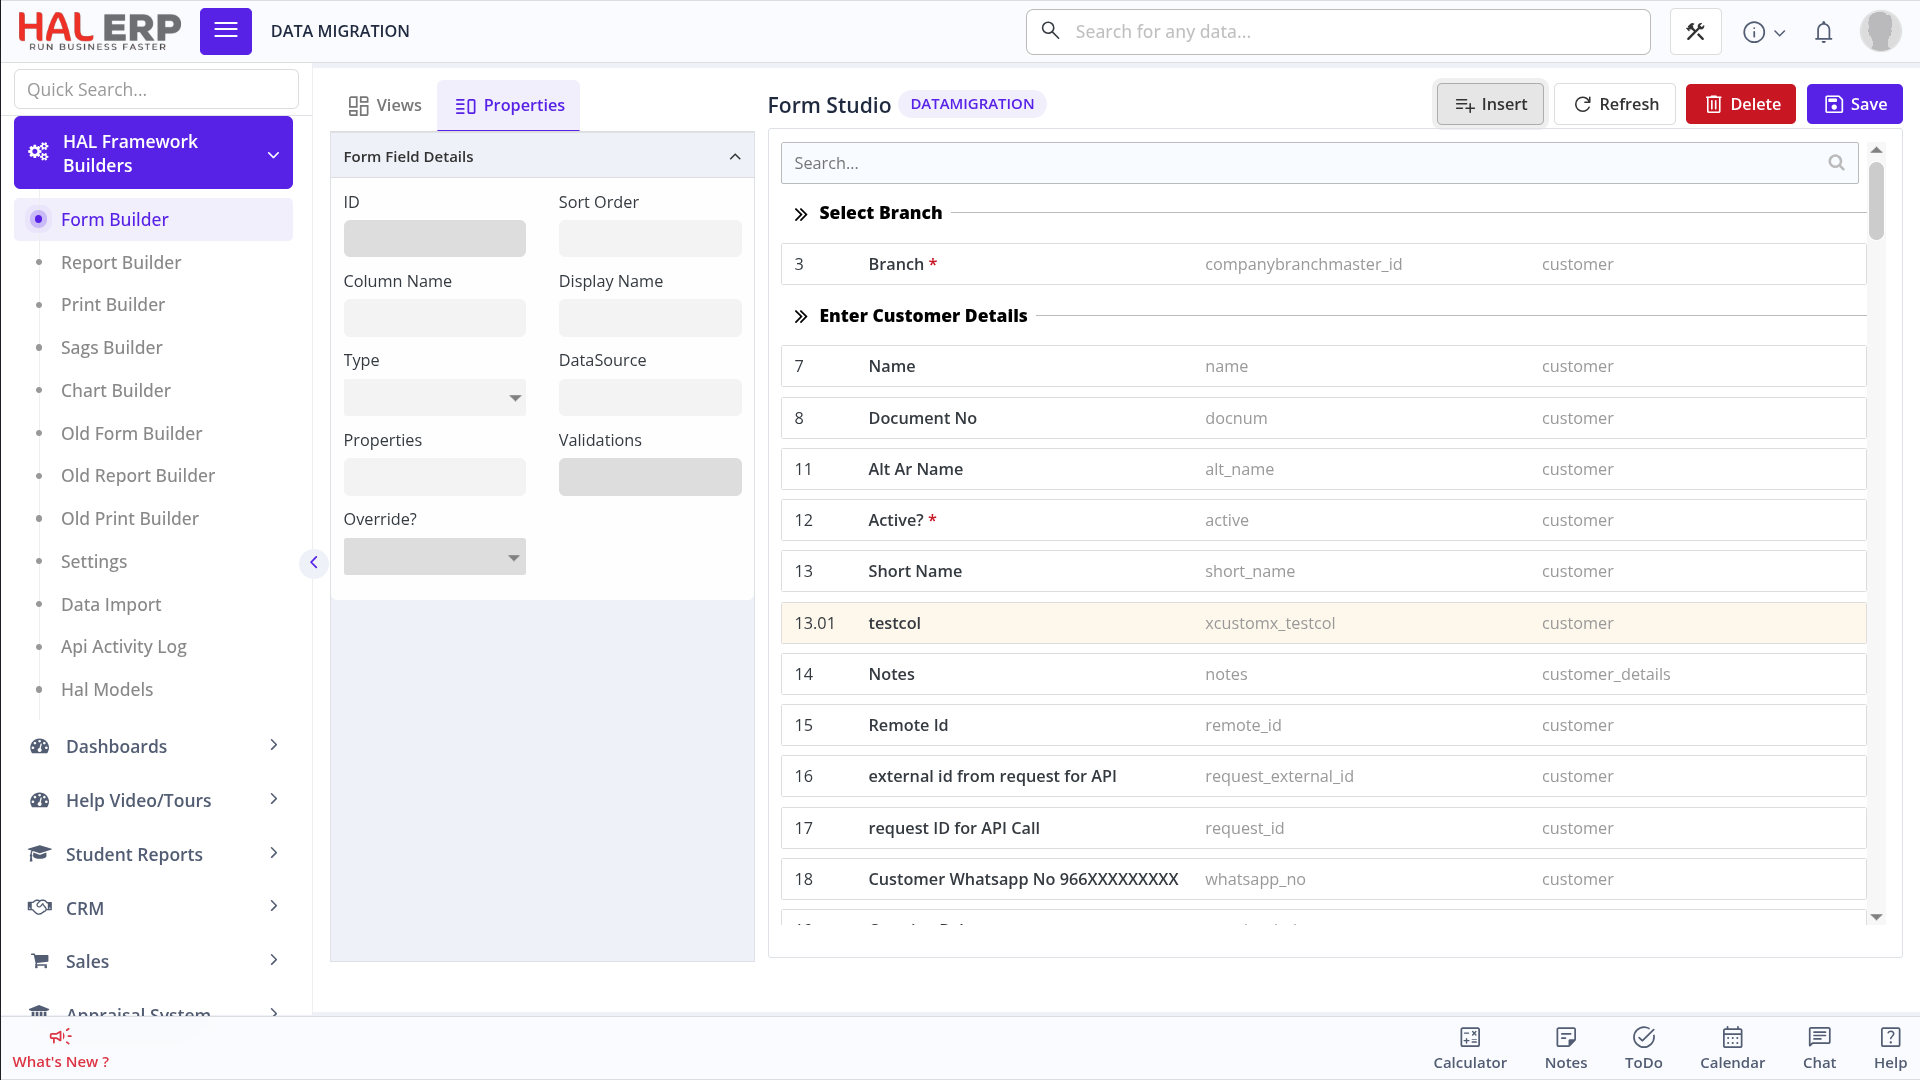 As you can see, the column has been added to the customer table. It has the header xcustomx_testcol, i.e. xcustomx_ is used for all custom fields that are created and testcol is the name that was given in the previous step.
-
When importing data into the custom column using the Data Import Tool, you need to ensure that it is mapped correctly in the Map Page.
4. Multi Currency & Multi Company
If your company uses multiple company branches or handles transactions in multiple currencies, this activates special settings in the system. These settings then make new options appear in the Data Import tool to help you manage your data correctly.
-
This option has to enable for having multiple currencies in the tenant.
<strong><span>NOTE:</span></strong><span> When you have multiple company branches, the option will appear once per Company Branch</span>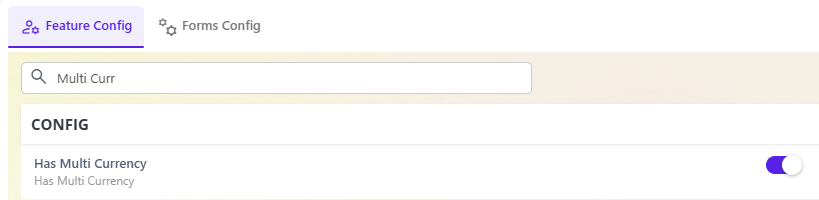
-
This option has to be enable to have multiple branches in the company (A.K.A Multi Company)
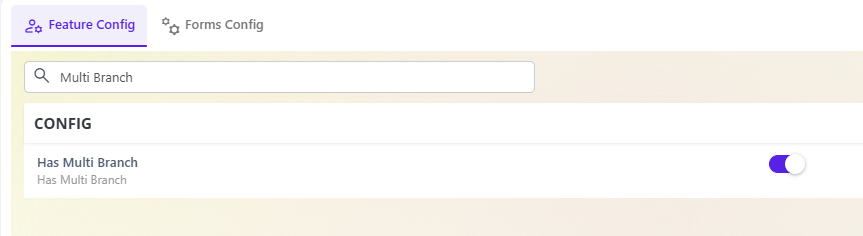
So when these options are enable for the tenant, the following options show in the Advanced Options section in the Data Import Tool Page
HAL Framework Builders >> Data Import
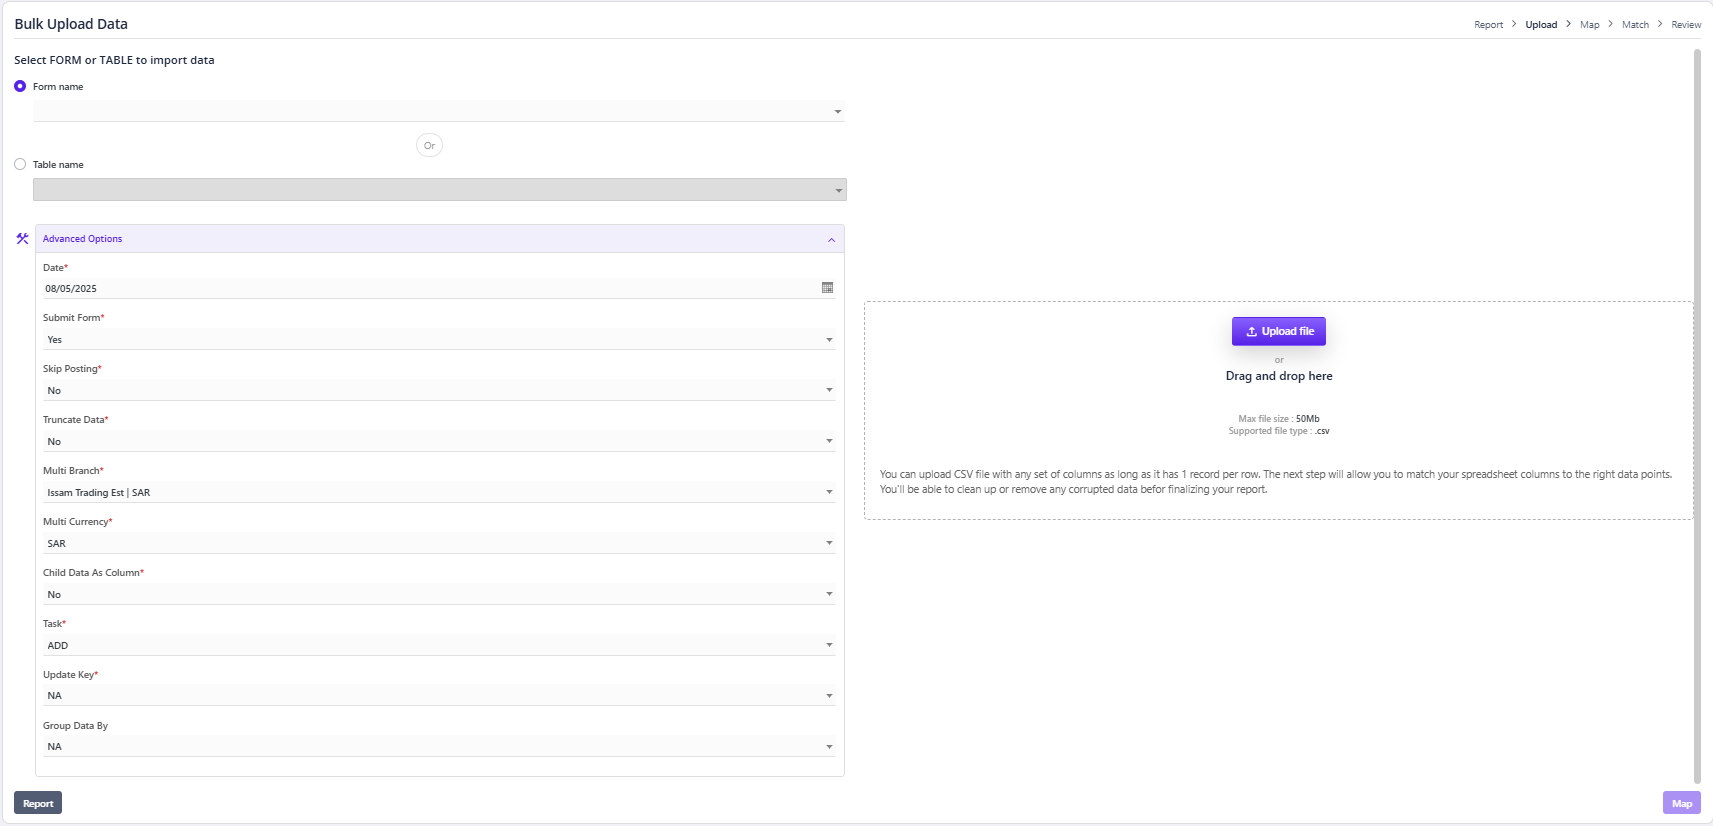
The following options are enabled according to the enabled setting in the ERP:
-
When your company is set up to handle multiple currencies, a 'Currency' drop-down menu will appear in the Advanced Options.

This option is used for the following forms:
- Vendor Advance
- Customer Advance
- Record Receivables
- Bills Payable
- And any other form where you specify currency amounts
Important Steps When Importing Multi-Currency Data:
- One Currency Per File: Each file you upload (.csv, etc.) should contain data for only one specific currency. Do not mix different currencies within the same file.
- Select the Data Currency: In the 'Currency' drop-down menu (which appears because Multi-Currency is enabled), select the currency of the numbers contained in your import file. For example, if your file has amounts in USD, select USD here.
- Use the 'Currency Conversion' Column for Rates: Instead of a column just for the currency code, you'll use a 'Currency Conversion' column. This is where you enter the exchange rate.
- How to Calculate the Rate: The rate you put in the 'Currency Conversion' column must be the rate needed to convert the currency of your data file into your company's main currency.
- Example: Your company's main currency is SAR. You are importing a file of Customer Advances where the amounts are in USD.
- In the 'Currency' drop-down, you select USD.
- In the 'Currency Conversion' column for each row, you enter the current exchange rate from USD to SAR. For instance, if 1 USD equals 3.75 SAR, you would enter '3.75' in this column for all USD amounts.
-
When your company is set up with multiple branches or entities, a 'Company Branch' drop-down menu will appear in the Advanced Options.
 This drop-down lets you choose which specific company branch the data you are importing belongs to. You will use this for importing data into various areas, from employee details to financial records like customer advances.